I have started painting and having lots of fun! Isn't this just the ugliest thing you have ever seen.
 Isn't this just the ugliest thing you have ever seen.
I really hated it and was very disappointed.
So...
 I painted over the parts I didn't like.
 I love how the sides turned out.
 And, now I am very happy with the finished project!
Oh, by the way the canvas is only 2 X 4.
 I will be gone from September 24-30.
 I will be visiting my four BFF high school friends
in Huntington Beach CA.
My daughter sneaked in the picture.
We were in Truckee visiting her at her pottery studio.
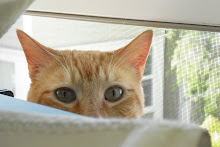
 Rocky must have used my camera!
~He likes being on my blog~
What a lovely tail.
 He is very proud of his big boy paws.
 He is very orange!
And, a big love of a cat.
Happy days to all my blogging freinds.
I will miss you!
You are all "purrfect."
Hugs, Dogwood
 He is very proud of his big boy paws.
 He is very orange!
And, a big love of a cat.
Happy days to all my blogging freinds.
I will miss you!
You are all "purrfect."
Hugs, Dogwood


